Translate

Sunday 24 May 2015

Wedding Album How To

As promised in yesterdays post, here are some step-by-step instructions so that you to can make your own albums.

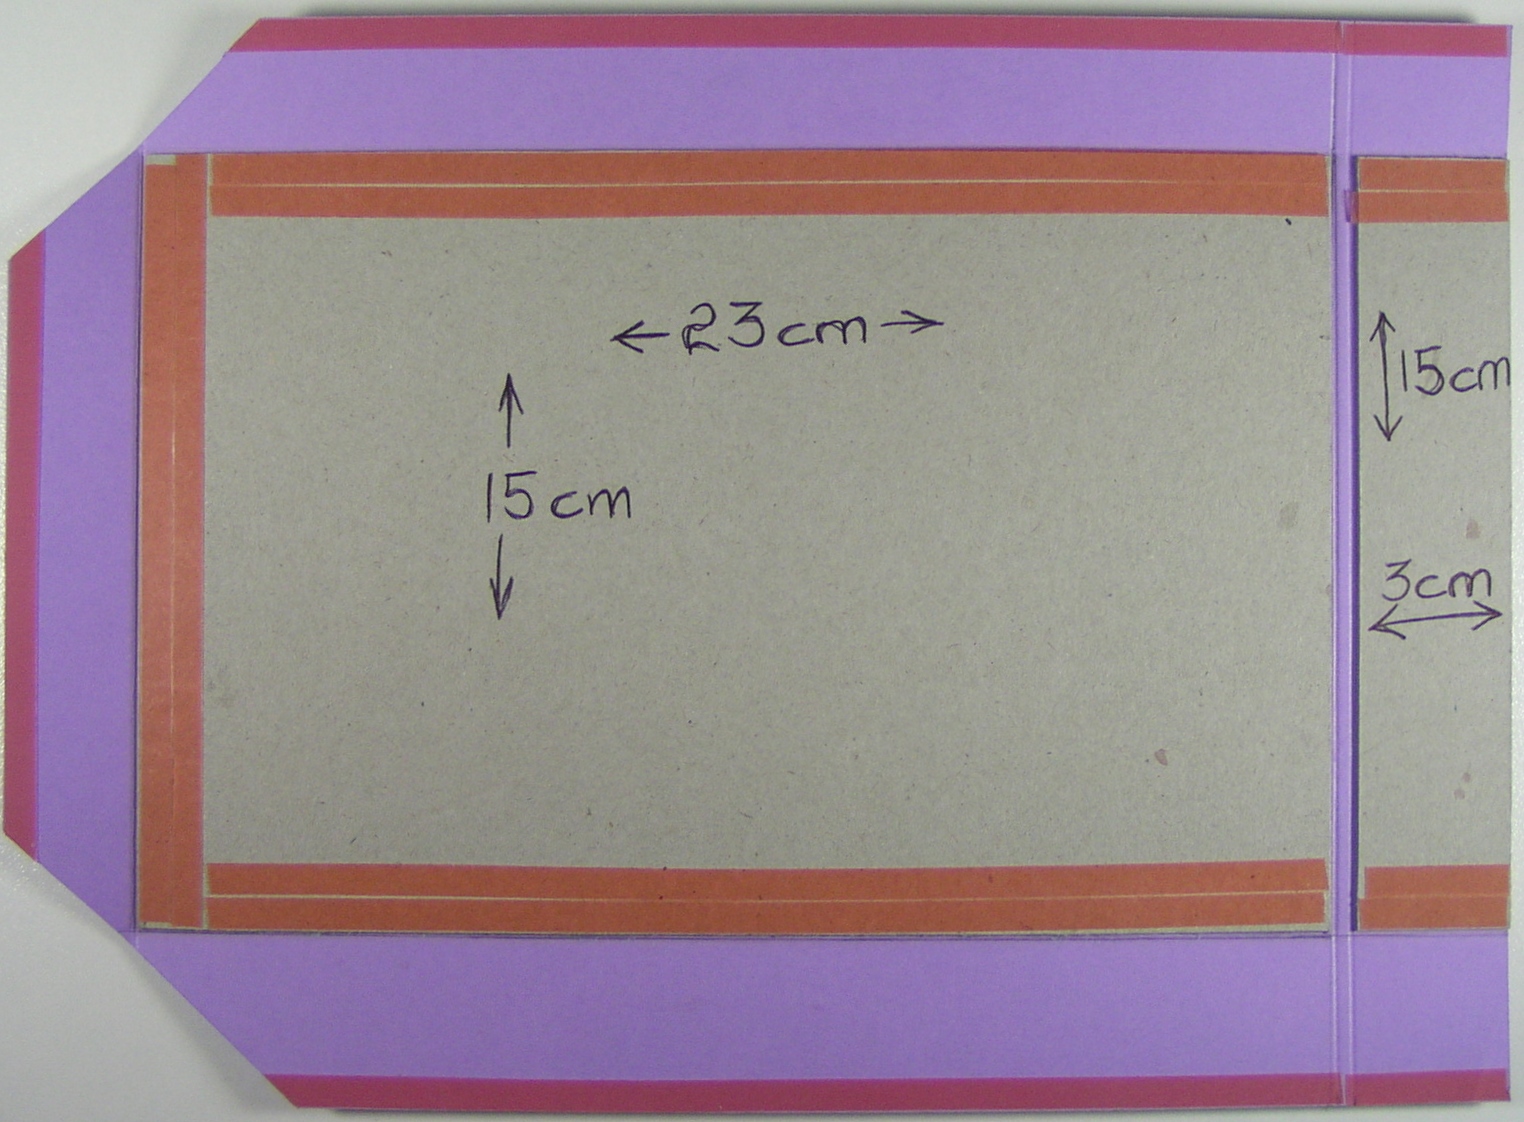
To begin with I have cut down a piece of chipboard sheet (that was 30cm * 30cm) so that I had 2 pieces that were 15cm * 23cm and another piece that was 3cm * 15cm. Next you will need 2 pieces of A4 cardstock. I have scored both of these along a short and long side at 1". Next place your 15cm * 23cm chipboard piece on the cardstock, lining it up with the score lines. With a pencil mark where the chipboard edges are on the opposite sides. Score along these lines also. Make an additional score line on the short side that is 1/4" out from the last. Stick down the large chipboard pieces so that they are inside the scored lines of the cardstock. On one of the pieces of cardstock also stick down the small chipboard piece (aligning it with the score lines). Add tape (like in the below pictures), and your 2 pieces of album cover should look like these next pictures.


 Next you will need to trim the cardstock off in line with the edge of the small chipboard piece. You will also need to trim the 2 corners off, but make sure to leave a little space between the edge and the cut line so as to cover the thickness of the chipboard. Tape has also been added to the spine piece of chipboard and cardstock (as in the next picture).
 
 
With  the other piece you will need to cut the corners off in the same manner as before. You will also need to trim about 1cm from the other short side. Your piece should look like this.

 
 Remove the tape from the short side of the chipboard and cardstock, and using a bone folder fold the cardstock over and stick it down. Now do the same for the long sides, but before you stick them down use your bone folder to tuck the corners in so that you have a neat finish. I have gently pushed my bone folder in between the two chipboard pieces to help them fold easily. Your first piece should now look like this.
 
 
Using the same process as before do the short side of the other piece. Now you will need to add some tape/glue to the other short side. Carefully line up your first piece with this piece and stick them together. Then continue to fold and stick down the long sides. Your cover should now resemble this.


Now it's time to start decorating your outside cover. For mine I started by using glue to stick some lace down.

 
I cut down a piece of matching material and used this on the back cover.
 
 
Another piece of the material was cut down to 11.5cm * 23cm and was stuck to a piece of the cardstock for additional support. A layer of chipboard was added underneath it (9.5cm * 20.5cm). This was then stuck to the front of the album cover.
 
 
Another two pieces of cardstock were cut down to 14.5cm * 25cm and scored at 23cm. These were then stuck to the inside of the album as seen in the next pictures.


To finish it off the rings and binding were added to the spine, and embellishments added to the front cover.


So what do you think? Think you might give it a go?
 
Until next time,
 
Thanks for joining me.
 
Jodie

Friday 22 May 2015

Wedding Album and Quick Birthday Card for Memory Maze

Hi all. I hope this post finds you all well. Things are busy as usual here, but let's face it when are things not! This time around I have made some items for my in-laws. Fingers crossed they like them. Feel free to leave me a comment and let me know what you think of them.

Wedding Album

The first was a request from my sister-in-law as she has a heap of their wedding photos that are 5" × 7", that are just stored in a box at present (and have been for over a decade)! So the brief was to create something to store the pictures in that would also protect the photos and allow them to be accessed when needed. She knew that the old style of album sleeves weren't any good for your pictures (because of the acid in the glue that allowed you to stick the photos in place), but liked the idea of some type of plastic sleeves to store the photos so that they could be pulled out easily if needed. After assuring her that the majority of plastic sleeves out there these days were acid free and archival quality, she agreed to leave it in my hands. Very trusting, isn't she!

So I put on my thinking cap and decided to make my own albums for her. I grabbed some project life plastic sleeves in 5" × 7" for her pictures and the rest was up to me. I've cut down some chipboard sheets to create the album covers and covered these in paper, material, lace and binding.
 
 
I've used some chipboard wedding themed words to help decorate the front cover. These have all been prepared by spraying with Perfect Pearls Mist (grape fizz) to begin with. The title Wedding word has then been coated in several coats of Zing embossing powder (lavender opaque finish). The remaining words were then stamped with a glue pad and have had Pearl Ex powder in misty lavender (688) lightly brushed over the top, before having a layer of Glossy Accents applied.

To complete the album I've just covered the inside of the album and added some metal rings to hold the plastic sleeves in place. Hey presto! Job done.
 
 Quick and Easy Birthday Card
 
In addition to the wedding album I also have a quick, super easy birthday card for you today. It is for my nephew who will be 11 soon. He loves his motorbike, so I thought the Heel Click chippie would be fitting. I have coloured it in with a black watercolour pencil. I used a cogs stamp to stamp embossing ink over it and covered it with white embossing powder. Once heated it gave a pretty cool effect (even if I do say so myself). The same cogs stamp was then used in the background in addition to a happy birthday sentiment.
 
 
That's it for me for now, but if you come along again tomorrow I will have a tutorial on how I made the wedding album. If you like any of the chippies used for this post please contact Memory Maze
Hopefully I'll see you again tomorrow,
 
Jodie Mason
 

Wednesday 13 May 2015

May's Card post for Stick It Down

I hope this post finds you all well. Here in Queensland, Australia, the weather outside is starting to get quite chilly, and along with the storms we've had lately is providing the perfect atmosphere to stay inside and get crafty. Now as those of you that follow my blog know by now, with a new month brings a new set of challenges over at Stick It Down. Being on the card team this picture was the challenge before me.


I had just received a new set of dies from my favourite local supplier (yes Shelley I'm talking about you) (and for those of you that would like to check her collection out you can do so here), and they were the perfect size to put on a guys card. Now I don't know about you, but all of the guys in my life know their way around a tool belt or two, if you get what I'm saying. I mean it might be dangerous to let me loose in a craft store with a wallet full of cash, but my hubby is just as dangerous in a hardware store, if not more so! Anyway, I flicked through my pile of scrap paper and found some great colours to go on a guys card, and this was what I ended up with.


Something nice, simple and understated. What do you think? Now Stick It Down don't only provide card challenges, they also have single and double page scrapbooking challenges too. So why not pop on over and check them out.

Until next time,

keep creating,

Jodie.


Sunday 3 May 2015

Kids Pencil Case

Hi all. Jodie here again with something a bit different today. One of my sons had a homework challenge from school that had to be a craft item. Hence he came in the door calling straight out to me. It had to involve some kind of recycling or up-cycling, so we put on our thinking caps. As a typical 7 year old boy Beau decided that it HAD to contain something to do with the Avengers or Captain America. Yeah, cause that comes so naturally for me! Anyway, we were able to fulfil the brief and as he also had to report on how he went about creating his masterpiece, we thought why not put some step-by-steps up here so you too could have an awesome up-cycled pencil case.

Captain America Up-Cycled Pencil Case.

Materials Required:
* A chip tin like that of Pringles.
* White Gesso
* Gel Medium
* Printed pictures of your choice (in this case Captain America)
* Scissors
* Paint brush or foam brush.

Step 1: Time to eat some chips.


Although Beau did have some competition with his dad for this job.


Step 2: Rinse out the chip tin to remove any left over crumbs and seasoning.


Step 3: With your paint brush / foam brush cover the outside of your chip tin in gesso. Let this dry between coats. You will likely need about 3 coats.


Step 4: Carefully cut around your images to use on your tin. Children may need some help with this bit.


Step 5: With a paint brush / foam brush apply a layer of gel medium to the section of tin that you want to apply your picture. Stick your picture onto this and smooth out any air bubbles. Then apply a layer of the gel medium over the top of your picture to ensure it gets stuck down. Continue to do this until your tin is covered in pictures. Let this all dry.

Step 6: Apply another coat or two of gel medium over the top of your tin to seal all of your pictures. Let this dry.

Step 7: Put the lid back on and it is ready to go. Enjoy your own custom made pencil case.


I must say that I am incredibly proud of Beau as he did the majority of this all by himself. Once shown how to do the steps he did the rest all alone. His big brother was so impressed that we now have to go through the process again for him.

Feel free to let Beau and I know what you think of his creation, and I will pass your comments on to him.

Until next time,

Happy Crafting,

Jodie.